Treen Turning... Content © Rockler.com ~ Wood Turning Tutorial |
 Treen is a term used to describe any of a number of small, utilitarian items made from wood. Treen, literally means "from a tree" and can cover anything from carved kitchen ware such as spoons and porringers, to turned boxes and bowls. Treen is a term used to describe any of a number of small, utilitarian items made from wood. Treen, literally means "from a tree" and can cover anything from carved kitchen ware such as spoons and porringers, to turned boxes and bowls.
Though the word has been out of general use for some time, it is returning and is particularly apt for the many small hand turned objects now being made. |
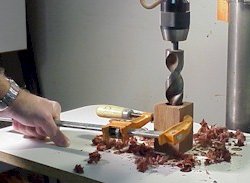
 The first step in making a small container like the ones shown, is to bore a hole in a wood blank. Our mandrels require a 1-1/4" hole which can be bored with a multi-spur, brad point or Forstner bit. The depth can be anything up to 4" for a two inch turning blank. The first step in making a small container like the ones shown, is to bore a hole in a wood blank. Our mandrels require a 1-1/4" hole which can be bored with a multi-spur, brad point or Forstner bit. The depth can be anything up to 4" for a two inch turning blank.
It is wise to use a drill press vice or clamp, as shown to prevent the blank from spinning and hurting your hand. Of course the drill press should be set at it's slowest possible speed. |
 The blank is then slid onto the large mandrel and secured by bringing the tailstock up to clamp it. Note that a pointless (no pun intended) live center is used to avoid marking the bottom of the vessel. The sharp edge of the mandrel will grip the bottom of the hole and hold it firmly for turning. The blank is then slid onto the large mandrel and secured by bringing the tailstock up to clamp it. Note that a pointless (no pun intended) live center is used to avoid marking the bottom of the vessel. The sharp edge of the mandrel will grip the bottom of the hole and hold it firmly for turning.
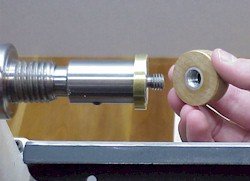
Both mandrels have tapped holes in the small end so that a draw bar may be fitted to prevent them from working out of the spindle hole. |
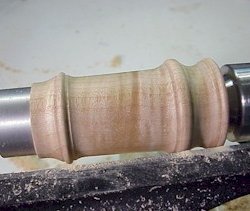
 The container can then be turned. Since it is fully supported within, it can be made very thin without danger of coming apart or collapsing in the lathe. The container can then be turned. Since it is fully supported within, it can be made very thin without danger of coming apart or collapsing in the lathe.
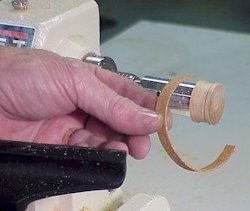
In addition, it can be removed from the mandrel and reinstalled without concentricity problems and the cavity will always be centered since the part is turned around the hole. The only problem that can arise is if the blank, having been bored, is not turned for some time, allowing the wood to shrink or distort so that it will not fit over the mandrel. It is best to not bore the cavity until you are ready to turn the part. The smaller mandrel is for turning the lid and stopper. The lid being the decorative exterior part and the stopper being the fitted part that goes into the top of the vessel. These two parts are made separately to make them easier to turn and fit. |
 Drill the blanks for the lid and stopper with a 1/2" drill, slightly more than 3/8" deep, and use super glue to install the female fittings. Drill the blanks for the lid and stopper with a 1/2" drill, slightly more than 3/8" deep, and use super glue to install the female fittings.
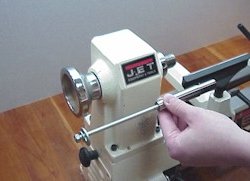
Both parts may be turned on the small mandrel without the use of the tail stock. It will be safer and more secure if a draw bar is fitted for this operation. You can make the draw bar yourself from a piece of 1/4-20 threaded rod, a nut and washer. |
 A brass gauge ring is supplied which can be slipped over the small mandrel. It is 1-1/4" OD and serves to help turn the stopper to it's proper size. Though the stopper may be made to fit very well initially, humidity and age will probably change the shape of both the vessel and the stopper so that they no longer fit as well. A brass gauge ring is supplied which can be slipped over the small mandrel. It is 1-1/4" OD and serves to help turn the stopper to it's proper size. Though the stopper may be made to fit very well initially, humidity and age will probably change the shape of both the vessel and the stopper so that they no longer fit as well.
Using wood from the same stock with the grain oriented the same way will help prevent these problems, but it is also possible to fashion a more forgiving plug by making a "corked" stopper. |
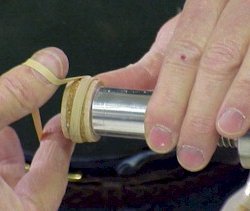 A shallow groove can be cut in the stopper and a cork band glued in. The cork, sands very easily and is springy enough to allow for the wood to expand and contract without spoiling the fit. We supply the 1/16" cork sheet for this purpose. A shallow groove can be cut in the stopper and a cork band glued in. The cork, sands very easily and is springy enough to allow for the wood to expand and contract without spoiling the fit. We supply the 1/16" cork sheet for this purpose.
Ordinary wood glue will work well for this, but it must be allowed to dry overnight since it will cause the cork to expand if sanded to shape before thoroughly dry, it will shrink back causing the joint to be loose. |
 A rubber band is a handy way to hold the cork on the stopper while the glue dries. The upper, decorative part of the lid is turned on the lid mandrel and is simplified since the tail stock is not used and end treatments, such as the ball, are easy to perform. A rubber band is a handy way to hold the cork on the stopper while the glue dries. The upper, decorative part of the lid is turned on the lid mandrel and is simplified since the tail stock is not used and end treatments, such as the ball, are easy to perform.It too can be removed from the mandrel at anytime to test its fit and appearance against the vessel. Once the lid and stopper have both been finished they can be assembled by using the 3/8" threaded stud to connect them. If a permanent connection is desired, a drop of super glue on the stud will lock it in. ~ Jerry Beal, 2001 |
