
Shop Tutorial ~ Modern Techniques of Veneering
Content © Rockler.com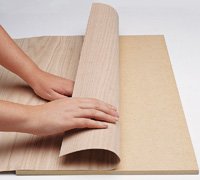 If you've been wanting to tackle a wood veneering project, but haven't been sure how to get started, you've come to the right place. At Rockler Woodworking and Hardware, we want to help you get started with your first veneering project, and we want it to be a success. So we put together this article where we'll give you a glimpse of the history of wood veneering, describe a few of veneering's most outstanding benefits, and describe the most common types of veneer and methods for applying veneer to a substrate. If you've been wanting to tackle a wood veneering project, but haven't been sure how to get started, you've come to the right place. At Rockler Woodworking and Hardware, we want to help you get started with your first veneering project, and we want it to be a success. So we put together this article where we'll give you a glimpse of the history of wood veneering, describe a few of veneering's most outstanding benefits, and describe the most common types of veneer and methods for applying veneer to a substrate. |
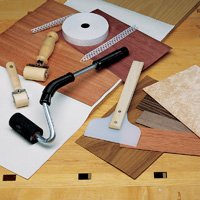
When you're ready to start your veneering projects, Rockler has everything you'll need - from high quality face grade veneers to the best veneering equipment, including scrapers, veneer smoothing blades and rollers, adhesives, veneer cutters, and how-to books like this one.
▸ Wood Veneering MisunderstoodWhat do you think of when you hear the word "veneer"? If the term calls to mind furniture masterpieces with complicated marquetry designs or criss-crossing patterns of inlay, then you may think of wood veneering as an exalted technique reserved for only the most skilled woodworkers. On the other hand, if you were educated in the solid wood construction school of woodworking, you might think of veneering as low grade substitute for the "real thing".The truth is, neither view gives a very accurate picture of the craft. Veneering is simply a method for decorating the surface of one material with another more attractive material. In the hands of an expert, it can produce some of the most remarkable effects in woodworking, but there's also plenty of room for beginners. Most veneering techniques, in fact, aren't all that complicated, and with just a few hand tools and with a little know-how you can have perfect results right from the beginning. The idea that no self-respecting woodworker would stoop to the "deceptive" practice of veneering is another unfortunate misconception. Veneered surfaces made with modern techniques and materials are every bit as durable and attractive as solid wood, and in many situations veneering offers considerable advantages over solid wood construction. Substrates for veneer, for example, can be chosen for their dimensional stability and other construction properties rather than their appearance. And once they actually know a little about veneering, most woodworkers come to see it as a respectable and extremely useful technique. ▸ A Brief History of Veneer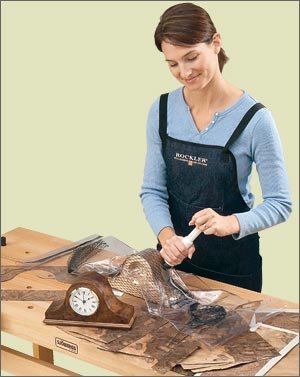 Techniques for decorating wood with veneer have been around for a while. Veneers of African ebony with inlays of ivory and other exotic materials were commonly used to decorate artifacts the Pharaohs planned to take with them into the afterlife beginning with the earliest dynasties - fragments of inlaid wood roughly 5,000 years old were found in King Semerkhet's tomb. An extravagantly inlaid table presented to Julius Cesar by Cleopatra, and a citron table purchased by the Roman orator Cicero, which featured "veins arranged in waving lines to form spirals like small whirlpools," are two examples of the highly developed veneering techniques in practice over 2000 years ago. Techniques for decorating wood with veneer have been around for a while. Veneers of African ebony with inlays of ivory and other exotic materials were commonly used to decorate artifacts the Pharaohs planned to take with them into the afterlife beginning with the earliest dynasties - fragments of inlaid wood roughly 5,000 years old were found in King Semerkhet's tomb. An extravagantly inlaid table presented to Julius Cesar by Cleopatra, and a citron table purchased by the Roman orator Cicero, which featured "veins arranged in waving lines to form spirals like small whirlpools," are two examples of the highly developed veneering techniques in practice over 2000 years ago.
In the seventeenth century, veneering took a major step forward with the development of better woodworking tools. And by the beginning of the eighteenth century, veneering began to take center stage when a shift in furniture making style replaced frame and panel construction with case and drawer construction, and surfaces of figured veneer were favored over shaped panels and carved surfaces. Toward the end of the eighteenth century, veneering reached a high point in the meticulously inlaid neoclassical furniture of designers like George Hepplewhite and Thomas Sheraton. It was in the nineteenth century that veneering started to develop a bad reputation when some furniture manufacturers were using veneer mainly as a method of covering badly constructed furniture. By the middle of the 1800s, commercial furniture producers in America had grown into factory-type operations that weren't reliant on skilled cabinetmakers, and veneer was seen as a way to save on material costs more than as unique decorative technique. To compound the problem, methods for producing the large amounts of veneer necessary for the level of furniture production that was going on were crude compared to the current state of the art. The result was thousands of pieces of cheaply constructed furniture with low quality veneered surfaces. Over the past few decades, wood veneering has been on the upswing. Veneering techniques and equipment have been perfected to the point where veneer is an extremely reliable choice for producing natural wood surfaces for furniture and cabinets. Veneering also offers a method for using exotic wood species that's much less demanding on hardwood resources than solid wood construction. Veneer cutting equipment that produces near perfect results, along with the reliable adhesives and stable man-made substrates like MDF (medium density fiberboard) make veneering an exceptionally viable alternative to solid wood construction in a number of woodworking applications. 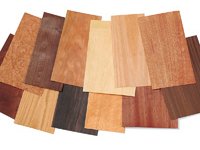 ▸ Types of Wood VeneerThere are several types of wood veneer, from exotic, highly figured veneers cut from Macassar ebony, crotch mahogany, or walnut burl to low-cost veneers used as a backer to balance the non-visible side of a veneered panel. In ancient times, wood veneers could range from 1/8" to 1/4" thick, but today wood veneers are usually sliced to a thickness of 1/90" to 1/40" and a veneer of 1/16" would be considered very thick.Most veneer is either rotary cut or or cut in single sheets from a flat surface of a log. In rotary cutting, a log is mounted on a lathe and rotated so that long sheets of veneer can be peeled off with a veneer cutting knife. The rotary cutting method allows large amounts of veneer to be cut in a short time, but because the grain pattern is usually considered less desirable than flat cut veneer, and also varies considerably and is difficult to match, it is not often used in one-off furniture making, where the finished look of the piece is a primary consideration. "Plain sliced" veneer is an example of a veneer produced by moving a flat piece of wood called a flitch along its length or crosswise against a stationary veneer cutting blade. The resulting veneer is packaged in piles of eight sheets (also called a flitch). Since a flitch of veneer represents only a very small section of the original piece of wood, and since no wood is lost in the cutting process, the grain pattern of the individual sheets usually stays pretty consistent throughout. This consistency of color and grain pattern make matching the individual sheets of veneer easy, and the results are often striking. In plain slicing, the blade is positioned parallel to the center of the log, producing the characteristic "cathedrals" in the center of the sheet, with a narrower grain pattern toward the outside edges of the sheet. Variations of the plain slicing method include rift slicing, half-round slicing, and quarter slicing. All of these methods differ in how the blade is oriented to the grain of the wood. In quarter slicing, for example, the flat surface of the flitch is cut perpendicular to the annual growth rings of the tree. The method produces unique patterns, like the characteristic medullary ray flecks of quartered oak and the striped effect in quarter sliced African "ribbon stripe" mahogany. 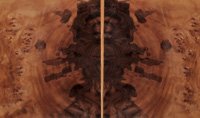 The veneers produced by these methods can be arranged (or matched) in different ways to get the desired appearance. "Bookmatching" is one of the most popular arrangements for highly figured veneer, such as burl or crotch mahogany. In bookmatching, alternating sheets of veneer from a single flitch are flipped over to produce a mirror image between adjacent sheets of veneer. The veneers produced by these methods can be arranged (or matched) in different ways to get the desired appearance. "Bookmatching" is one of the most popular arrangements for highly figured veneer, such as burl or crotch mahogany. In bookmatching, alternating sheets of veneer from a single flitch are flipped over to produce a mirror image between adjacent sheets of veneer.
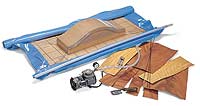
Once they are cut, veneers are prepared in a variety of ways to serve different applications. Plain sliced veneer with no paper or adhesive backing is the most straightforward example, and is most useful for veneering flat surfaces. Paper-backed veneer is a good choice for working with curved surfaces, since it will flex readily without the risk of breaking. Other types of specialty veneers include pressure sensitive or "sticky-backed" veneer that has a pressure sensitive adhesive applied to its back surface. This peel and stick veneer is a good choice if speed and convenience are what you're after. Two-ply veneer is a special grade of veneer made up of two sheets of veneer applied to one another so that their grain orientation is at 90°, adding strength and stability to the veneer. ▸ There are a number of acceptable methods for applying veneer. From the time-honored craft of hammer veneering to modern vacuum press veneering, each method has its advocates and applications where it works best. Although many woodworkers have their favorites, there is probably no one method that is the best choice for all situations. The method to choose depends on the type of project you are doing and the amount of time and expense you want to devote to your veneering project. ▸ Read Apply Veneer with Contact Cement
|
📌 Content © Rockler.com ~ The products on this page are available at Rockler.com.